Visual Studio MVVM Architecture
17 January 2019
So for my first week at my internship at DisputeSoft I’ve been learning a new design pattern, MVVM, for the code compare application that I’ll be working on during my time here. I’ve had some experience with the MC (Model View Controller) architecture from my android programming class, but what is this new mysterious MVVM? Admittedly, I was a little confused at first, like what is the difference between Controller and View Model? But it’s really not hard to understand, especially if you have workin knowledge of the MVC design pattern.
So what is MVVM? Basically, it stands for Model, View, and View Model.
The Model is the data models and the information of our application. The View is the presentation of the data, the thing that the user sees and interacts with. View Model is the separation between the view and the model, so that these two don’t have to interact with each other. I may have methods or commands that may change the model, or trigger events in the view.
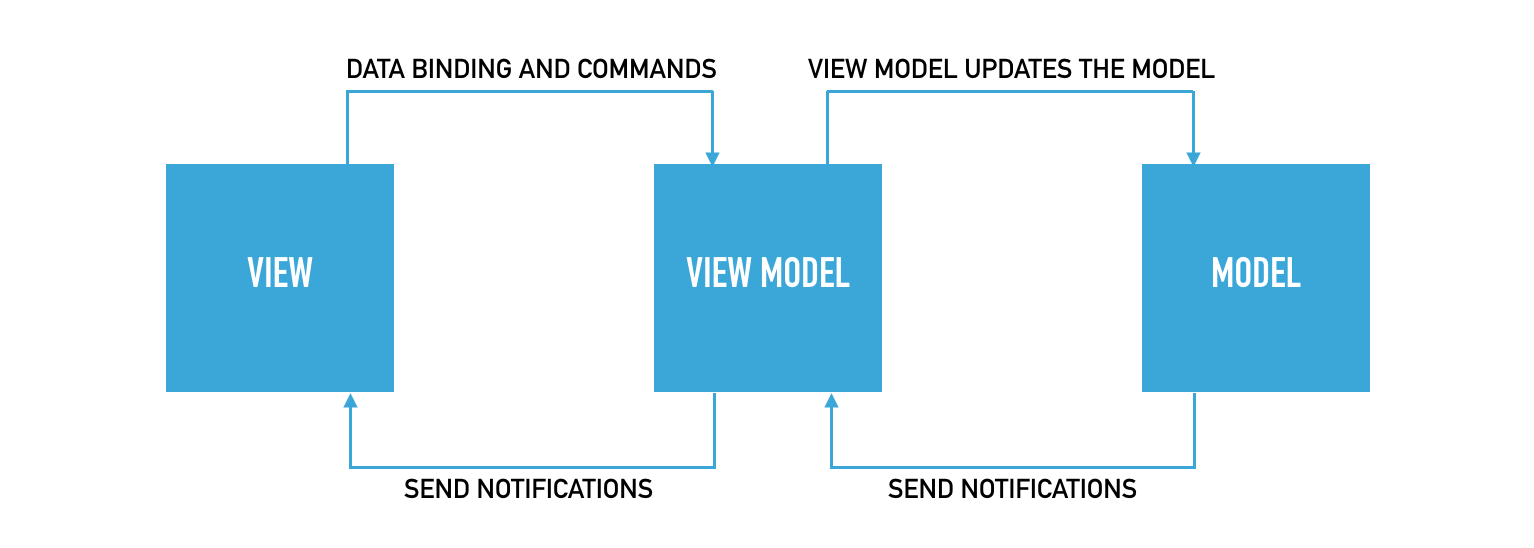
Here is a good image I found that shows the interaction between the view, view model, and model. One of the key differences between MVVM and MVC is that MVVM us used for two-way binding of data within views, whereas MVC is convered with separation on the server-sdie.
I created a simple MVVM application for better understanding. In this application, you enter a client name and description, adding it to a list of clients that appears in the view. Furthermore, yu can edit the description after you added the client, or delete a selected client. So let’s see how this application follows the MVVM design pattern!
Again, the model is the data lyaer of our application, and here, the data is the CLIENTS. We are adding, editing, and deleting clients, and the updates are shown in the view.
using System;
using System.Collections.Generic;
using System.Linq;
using System.Text;
using System.Threading.Tasks;
using System.ComponentModel;

namespace AppDemo.Models
{

    public class Client : INotifyPropertyChanged
    {
        private int id;
        private string name;
        private string description;

        public int Id
        {
            get;
            set;
        }

        public string Name
        {
            get { return name; }
            set
            {
                if (name != value)
                {
                    name = value;
                    RaisePropertyChanged("Name");
                }
            }
        }

        public string Description
        {
            get { return description; }
            set
            {
                if (description != value)
                {
                    description = value;
                    RaisePropertyChanged("Description");
                }
            }
        }

        public event PropertyChangedEventHandler PropertyChanged;

        private void RaisePropertyChanged(string property)
        {
            if (PropertyChanged != null)
            {
                PropertyChanged(this, new PropertyChangedEventArgs(property));
            }
        }

    }
}
The model contains the properties and property methods for id, name, and description. You might’ve also noticed that this model is implementing the INotifyPropertyChanged interface. Basically, the INotifyPropertyChanged interface is used to notify the view or ViewModel when a property is updated (used when I edit the clients). You need to create a PropertyChangedEventHandler, and call that handler within the property methods.
Now that we’ve finished the Model, we can move on to the View Model.
using System;
using System.Collections.Generic;
using System.Linq;
using System.Text;
using System.Threading.Tasks;
using AppDemo.Models;
using System.Collections.ObjectModel;

namespace AppDemo.ViewModels
{
    class ClientViewModel
    {
        private ObservableCollection<Client> clients = new ObservableCollection<Client>();
        private int count;

        public ClientViewModel()
        {
            Clients = clients;
            count = 0;
        }


        public ObservableCollection<Client> Clients
        {
            get;
            set;
        }

        /// <summary>
        /// Add client to list
        /// </summary>
        /// <param name="name">client name</param>
        /// <param name="description">client description</param>
        public void addClient(string name, string description)
        {
            clients.Add(new Client { Name = name, Description = description, Id = count });
            count += 1;
            Clients = clients;
        }

        /// <summary>
        /// delete the selected client from list
        /// </summary>
        /// <param name="client">selected client</param>
        public void deleteClient(Client client)
        {
            clients.Remove(client);
        }

    }
}
This view model holds the list of clients in the ObservableCollection clients, as well as the count of the clients (which is used to set the id of the client). As you can see we have a method to get/set the clients, a method to add a client and a method to delete a client. That’s all we need! It’s that simple. This view model holds the client (model) and then communicates with the view, as you will see soon. And this is why the view model is considered as the communication between the model and view.
Now, on to the view.
Here is the view for each Client, which displays the name and description of each client. The main window view, which you will see later on, has a list populated by this client view.
<UserControl x:Class = "AppDemo.Views.ClientView"
   xmlns = "http://schemas.microsoft.com/winfx/2006/xaml/presentation"
   xmlns:x = "http://schemas.microsoft.com/winfx/2006/xaml"
   xmlns:mc = "http://schemas.openxmlformats.org/markup-compatibility/2006"
   xmlns:d = "http://schemas.microsoft.com/expression/blend/2008"
   xmlns:local = "clr-namespace:AppDemo.Views"
   xmlns:viewModel = "clr-namespace:AppDemo.ViewModels"

   mc:Ignorable = "d" d:DesignHeight = "300" d:DesignWidth = "300">

    <UserControl.Resources>
        <DataTemplate x:Key="clientsTemplate">
            <StackPanel Orientation = "Horizontal">
                <TextBox IsReadOnly ="True" Text = "{Binding Path = Name, Mode = TwoWay}"
                        Width = "100" Margin = "3 5 3 5"/>

                <TextBox Text = "{Binding Path = Description, Mode = TwoWay}"
                        Width = "100" Margin = "0 5 3 5"/>

                <TextBlock Text = "{Binding Path = Id, Mode = OneWay}"
                        Margin = "0 5 3 5"/>

                <TextBlock Text = "{Binding Path = Name, Mode = OneWay}"
                                       Margin = "0 5 3 5"/>

                <TextBlock Text = "{Binding Path = Description, Mode = OneWay}"
                                       Margin = "0 5 3 5"/>

            </StackPanel>
        </DataTemplate>
    </UserControl.Resources>

    <Grid>
        <ListBox x:Name="myListBox"
         ItemsSource = "{Binding Clients}"
         ItemTemplate = "{StaticResource clientsTemplate}"/>
    </Grid>

</UserControl>
The binding path points to the property method in the model. I can set it as either twoway or oneway binding, indicating whether I want the model to dynamically change as I edit the textbook. For the name, I set it as one way so that it is not editable, and for the description, I set it two way so that editing the textbox updates the model dynamically.
And Lastly, here we have the main window view.
<Window x:Class="AppDemo.MainWindow"
xmlns="http://schemas.microsoft.com/winfx/2006/xaml/presentation"
xmlns:x="http://schemas.microsoft.com/winfx/2006/xaml"
xmlns:d = "http://schemas.microsoft.com/expression/blend/2008"
xmlns:mc = "http://schemas.openxmlformats.org/markup-compatibility/2006"
xmlns:local="clr-namespace:AppDemo"
xmlns:views="clr-namespace:AppDemo.Views"
Title="MainWindow" Height="350" Width="700">
<Grid Name="grid1" Focusable="True">
<Grid.RowDefinitions>
<RowDefinition Height="82*"/>
<RowDefinition Height="237*"/>
</Grid.RowDefinitions>
<TextBlock HorizontalAlignment="Left" Height="22" TextWrapping="Wrap" Text="Edit Name/Description	 	 Id Name/Description" VerticalAlignment="Top" Width="336"/>
<views:ClientView Margin="0,25,309,0" x:Name = "ClientViewControl" Grid.RowSpan="2"/>
<Button x:Name="addButton" Click="addButton_Click" Content="Add Client" HorizontalAlignment="Left" Height="38" Margin="420,66,0,0" VerticalAlignment="Top" Width="241" Grid.Row="1" RenderTransformOrigin="0.477,1.008"/>
<TextBox x:Name="NameBox" HorizontalAlignment="Left" Height="28" Margin="420,17,0,0" TextWrapping="Wrap" Text="Name" VerticalAlignment="Top" Width="241"/>
<TextBox x:Name="DescriptionBox" HorizontalAlignment="Left" Height="88" Margin="420,50,0,0" Grid.RowSpan="2" TextWrapping="Wrap" Text="TextBox" VerticalAlignment="Top" Width="241"/>
<Border BorderBrush="Black" BorderThickness="10,1" HorizontalAlignment="Left" Height="326" Grid.RowSpan="2" VerticalAlignment="Top" Width="13" Margin="370,0,0,-7"/>
<Button x:Name="deleteButton" Content="Delete Selected" Click="deleteButton_Click" HorizontalAlignment="Left" Height="42" Margin="419,109,0,0" VerticalAlignment="Top" Width="242" Grid.Row="1"/>
</Grid>
</Window>
The code for the view includes communication with the view model, to add and delete clients
namespace AppDemo
{
    /// <summary>
    /// Interaction logic for MainWindow.xaml
    /// </summary>
    public partial class MainWindow : Window
    {
        private AppDemo.ViewModels.ClientViewModel clientViewModelObject = new AppDemo.ViewModels.ClientViewModel();

        public MainWindow()
        {
            InitializeComponent();
            ClientViewControl.DataContext = clientViewModelObject;
        }


        /// <summary>
        /// Button to add client
        /// </summary>
        /// <param name="sender"></param>
        /// <param name="e"></param>
        private void addButton_Click(object sender, RoutedEventArgs e)
        {
           clientViewModelObject.addClient(NameBox.Text, DescriptionBox.Text);
           NameBox.Clear();
           DescriptionBox.Clear();
        }

        /// <summary>
        /// Button to delete Client
        /// </summary>
        /// <param name="sender"></param>
        /// <param name="e"></param>
        private void deleteButton_Click(object sender, RoutedEventArgs e)
        {
            if (ClientViewControl.myListBox.SelectedItem != null)
            {
                clientViewModelObject.deleteClient(ClientViewControl.myListBox.SelectedItem as Client);
            }
        }
    }
}